Hey there, fellow Android enthusiasts and security buffs! If you’re reading this, chances are you’re as fascinated by mobile security as I am. Today, we’re diving deep into the world of tapjacking – a sneaky little security vulnerability that’s been keeping Android developers on their toes for years. As someone who’s spent countless hours tinkering with Android apps and hunting for vulnerabilities, I’m excited to share my insights on how to test for tapjacking in Android applications.
Understanding Tapjacking: The Silent Threat
Contents
- 1 Understanding Tapjacking: The Silent Threat
- 2 Why Testing for Tapjacking Matters
- 3 Setting Up Your Testing Environment
- 4 Creating a Test Application
- 5 Manual Testing for Tapjacking
- 6 Automated Testing for Tapjacking
- 7 Advanced Tapjacking Testing Techniques
- 8 Common Pitfalls and How to Avoid Them
- 9 Best Practices for Preventing Tapjacking
- 10 Conclusion
- 11 Frequently Asked Questions
Before we roll up our sleeves and get into the nitty-gritty of testing, let’s take a moment to understand what tapjacking is and why it’s such a big deal in the Android security landscape.
Tapjacking, also known as “clickjacking” in the mobile world, is a malicious technique where an attacker tricks a user into interacting with a hidden interface element by overlaying it with a seemingly harmless UI. Imagine tapping what you think is a “Like” button on a cute cat video, but in reality, you’re authorizing a fund transfer to a shady offshore account. Yikes!
The reason tapjacking is particularly insidious is that it exploits human trust and interaction patterns. We’re all used to tapping buttons and links on our phones without giving it much thought. Tapjacking takes advantage of this habitual behavior to execute malicious actions without our knowledge.
Why Testing for Tapjacking Matters
As an Android developer or security researcher, understanding and testing for tapjacking vulnerabilities is crucial for several reasons:
- User Protection: Our primary responsibility is to ensure the safety and security of our users’ data and interactions.
- App Integrity: A tapjacking vulnerability can compromise the integrity of your app, potentially leading to unauthorized actions or data breaches.
- Reputation Management: Security issues can severely damage an app’s reputation. Nobody wants to be the developer whose app made headlines for the wrong reasons!
- Compliance: Many industry standards and regulations require robust security measures, including protection against UI redress attacks like tapjacking.
Now that we’ve covered the ‘why’, let’s roll up our sleeves and get into the ‘how’ of testing for tapjacking in Android applications.
Setting Up Your Testing Environment
Before we start poking around for vulnerabilities, we need to set up a proper testing environment. Here’s what you’ll need:
- Android Studio: If you don’t already have it, download and install the latest version of Android Studio from the official Android Developers site.
- Android Emulator or Physical Device: While an emulator is convenient, I always recommend testing on a physical device as well for more realistic scenarios.
- ADB (Android Debug Bridge): This comes bundled with Android Studio, but make sure it’s properly set up and accessible from your command line.
- A Test Application: You can either use an existing app you want to test or create a simple test app. We’ll go through creating a basic test app later in this guide.
- Tapjacking Test Tools: We’ll be using both manual techniques and some helpful tools like “Tapjacking Tester” (Note: This is a hypothetical tool for this guide. In reality, you might use various penetration testing tools or custom scripts).
Pro Tip: I always keep a dedicated “test” device that’s not my personal phone. This way, I can mess around with security settings and install potentially risky apps without worrying about my personal data.
Creating a Test Application
To really understand tapjacking, it’s helpful to create a simple app that we can use as a target for our tests. Don’t worry if you’re not an expert Android developer – we’ll keep it simple!
Here’s a basic app that we can use to demonstrate tapjacking vulnerabilities:
kotlinclass MainActivity : AppCompatActivity() {
override fun onCreate(savedInstanceState: Bundle?) {
super.onCreate(savedInstanceState)
setContentView(R.layout.activity_main)
findViewById<Button>(R.id.sensitiveButton).setOnClickListener {
Toast.makeText(this, "Sensitive action performed!", Toast.LENGTH_SHORT).show()
}
}
}
And here’s the corresponding layout file (activity_main.xml):
xml<?xml version="1.0" encoding="utf-8"?>
<RelativeLayout xmlns:android="http://schemas.android.com/apk/res/android"
android:layout_width="match_parent"
android:layout_height="match_parent">
<Button
android:id="@+id/sensitiveButton"
android:layout_width="wrap_content"
android:layout_height="wrap_content"
android:layout_centerInParent="true"
android:text="Perform Sensitive Action" />
</RelativeLayout>
This app has a single button that, when pressed, performs a “sensitive action” (in this case, just showing a toast message). In a real-world scenario, this could be something like making a purchase, sending a message, or changing account settings.
Manual Testing for Tapjacking
Now that we have our test app, let’s start with some manual testing techniques. These methods will help you understand the basics of how tapjacking works and how to identify potential vulnerabilities.
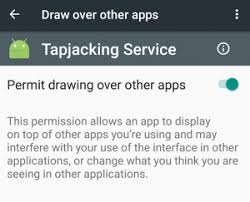
1. Overlay Permission Test
The first step in testing for tapjacking vulnerabilities is to check if the app properly handles overlay permissions. Here’s how:
- Install your test app on the device or emulator.
- Go to Settings > Apps > Your Test App > Advanced > Draw over other apps.
- If this permission is already granted, that’s a red flag. Apps should not have this permission by default.
- If it’s not granted, try to use the app’s sensitive features. The app should check for overlay permissions before performing sensitive actions.
2. Screen Capture Test
Some tapjacking attacks use screen capture to analyze the app’s UI. Test if your app prevents screen captures of sensitive information:
- Open your test app to a screen with sensitive information or controls.
- Try to take a screenshot (usually by pressing the power and volume down buttons simultaneously).
- If you’re able to capture the screen, that’s a potential vulnerability.
3. Toast Overlay Test
Toasts can be used for tapjacking if they’re not implemented securely. Here’s a simple test:
- In your test app, add a button that shows a long-duration toast:
kotlinToast.makeText(this, "Long toast message", Toast.LENGTH_LONG).show()
- Trigger this toast and quickly try to interact with the UI behind it.
- If you can interact with the UI while the toast is visible, that’s a potential tapjacking vector.
4. System Alert Window Test
System alert windows can be particularly dangerous for tapjacking. Test your app’s behavior with system alert windows:
- Create a simple app that uses
TYPE_APPLICATION_OVERLAYto draw over other apps. - Run this overlay app and then open your test app.
- Try to interact with your test app through the overlay.
- Your test app should detect the overlay and prevent interaction with sensitive elements.
Automated Testing for Tapjacking
While manual testing is crucial for understanding tapjacking vulnerabilities, automated tools can help us scan for issues more efficiently, especially in larger applications.
Using Android Lint
Android Lint is a static code analysis tool that comes bundled with Android Studio. It can detect potential tapjacking vulnerabilities:
- In Android Studio, go to Analyze > Inspect Code.
- Run the inspection on your entire project.
- Look for warnings related to tapjacking, such as “Toast.setOnClickListener” or “Tapjacking: ToastWindowLeaks”.
Custom Tapjacking Tester Tool
For this guide, let’s imagine we have a custom “Tapjacking Tester” tool. In reality, you might use various penetration testing tools or write custom scripts. Here’s how our hypothetical tool might work:
- Install the Tapjacking Tester app on your device.
- Grant it the necessary permissions (like overlay permissions).
- Open your test app.
- Activate the Tapjacking Tester, which will attempt to create various overlays and simulate tap events.
- The tool will report any successful tapjacking attempts.
Remember, in a real-world scenario, you’d need to be very careful with such tools and ensure you’re not violating any terms of service or laws.
Advanced Tapjacking Testing Techniques
Now that we’ve covered the basics, let’s dive into some more advanced techniques for testing tapjacking vulnerabilities.
1. Dynamic Analysis with Frida
Frida is a dynamic instrumentation toolkit that can be incredibly powerful for testing Android apps. Here’s a basic script to hook into touch events and detect potential tapjacking:
javascriptJava.perform(function () {
var View = Java.use("android.view.View");
View.onTouchEvent.implementation = function (event) {
console.log("Touch event detected!");
console.log("Raw X: " + event.getRawX());
console.log("Raw Y: " + event.getRawY());
return this.onTouchEvent(event);
};
});
To use this:
- Set up Frida on your testing device and computer.
- Run your test app.
- Inject the Frida script.
- Interact with your app and monitor the console output for touch events.
- Analyze if touch events are being processed as expected or if there are discrepancies that could indicate tapjacking.
2. Fuzzing UI Interactions
Fuzzing is a technique where we input random or unexpected data to try and trigger unusual behavior. For tapjacking, we can fuzz UI interactions:
- Create a script that generates random touch events across the screen.
- Run your app and start the fuzzing script.
- Monitor for any unexpected behaviors, crashes, or successful interactions with sensitive elements.
Here’s a simple ADB command to simulate a tap:
bashadb shell input tap X Y
You can create a script to run this command with varying X and Y coordinates.
3. Time-of-Check to Time-of-Use (TOCTOU) Testing
TOCTOU vulnerabilities can be exploited for tapjacking. Test for these by:
- Identifying places in your app where it checks for overlay permissions.
- Creating a malicious app that quickly toggles overlay permissions on and off.
- Time your test app’s sensitive actions to occur just after a permission check but before the actual action.
4. Multi-Window Mode Testing
Android’s multi-window mode can potentially be exploited for tapjacking. Test your app’s behavior in this mode:
- Enable developer options on your Android device.
- Turn on “Force activities to be resizable” in developer options.
- Open your test app in multi-window mode alongside a potentially malicious app.
- Try to interact with your app while the other app changes its window size or position.
Common Pitfalls and How to Avoid Them
Through my years of testing Android apps, I’ve come across several common mistakes that can lead to tapjacking vulnerabilities. Here are a few to watch out for:
1. Trusting the System Too Much
Some developers assume that the Android system will protect their app from tapjacking. While Android has improved its security measures over the years, it’s still crucial to implement your own protections.
Solution: Always check for overlay permissions before performing sensitive actions, and consider implementing your own touch filtering mechanisms.
2. Inconsistent Permission Checks
I’ve seen apps that check for overlay permissions on some screens but not others, creating inconsistent security across the app.
Solution: Implement a centralized security check that’s called before any sensitive action is performed.
3. Ignoring Custom ROMs and Root
Some developers forget that users might be running custom ROMs or have rooted devices, which can bypass some system-level protections.
Solution: Implement root detection and consider warning users or limiting functionality on potentially compromised devices.
4. Overlooking WebViews
WebViews can be particularly vulnerable to tapjacking, especially if they handle sensitive information or actions.
Solution: Be extra cautious with WebViews. Consider using setFilterTouchesWhenObscured(true) on WebViews and implementing additional security checks.
Best Practices for Preventing Tapjacking
As we wrap up our deep dive into tapjacking testing, let’s review some best practices for preventing these vulnerabilities in your Android apps:
- Use FLAG_SECURE: For sensitive screens, use
WindowManager.LayoutParams.FLAG_SECUREto prevent screen captures and add an extra layer of security. - Implement Overlay Checks: Always check for overlay permissions before performing sensitive actions. Here’s a simple way to do it:
kotlinfun checkOverlayPermissions(): Boolean {
return Settings.canDrawOverlays(this)
}
- Use setFilterTouchesWhenObscured: For sensitive UI elements, use
setFilterTouchesWhenObscured(true)to ignore touch events when the view might be obscured:
kotlinCopysensitiveButton.setFilterTouchesWhenObscured(true)
- Implement Touch Filtering: Consider implementing custom touch filtering to detect and ignore suspicious touch patterns.
- Use Confirmation Dialogs: For very sensitive actions, use system alert dialogs that can’t be overlaid.
- Stay Updated: Keep your app updated with the latest security patches and best practices from Android.
- Educate Users: Inform users about the risks of granting overlay permissions to untrusted apps.
For more detailed information on Android security best practices, check out the Android Security Overview from the official Android source.
Conclusion
Whew! We’ve covered a lot of ground in our exploration of tapjacking testing in Android. From understanding the basics of this sneaky vulnerability to implementing advanced testing techniques, you’re now well-equipped to hunt down and squash tapjacking bugs in your Android apps.
Remember, security is an ongoing process. Techniques for both attacking and defending against tapjacking are constantly evolving, so it’s crucial to stay updated with the latest Android security developments.
Testing for tapjacking isn’t just about finding vulnerabilities – it’s about understanding how users interact with our apps and how malicious actors might try to exploit those interactions. By thinking like both a user and an attacker, we can create more robust, secure applications that our users can trust.
So, the next time you’re working on an Android app, take a moment to consider its tapjacking defenses. Run through the tests we’ve discussed, implement the best practices, and always be on the lookout for new ways to secure your app. Your users (and your future self) will thank you for it!
Happy testing, and may your apps be forever tapjack-proof!
Frequently Asked Questions
- Q: Is tapjacking still a relevant threat in modern Android versions?
A: Yes, while Android has implemented various protections, tapjacking remains a concern, especially on devices with older Android versions or custom ROMs. - Q: Can tapjacking affect iOS devices?
A: While iOS has different security mechanisms, similar UI redress attacks can occur. However, this guide focuses specifically on Android. - Q: Are there any legitimate uses for overlay permissions?
A: Yes, some apps like screen dimmers, blue light filters, or accessibility tools use overlay permissions for legitimate purposes. - Q: How often should I test my app for tapjacking vulnerabilities?
A: It’s a good practice to test for tapjacking (and other security vulnerabilities) with each major update or at least quarterly. - Q: Can anti-virus apps protect against tapjacking?
A: Some security apps may offer protection against known tapjacking techniques, but they shouldn’t be relied upon as the sole defense. - Q: Is root access required to test for tapjacking?
A: While root access can provide more thorough testing capabilities, many effective tests can be performed without root access. - Q: How do I report a tapjacking vulnerability if I find one in a third-party app?
A: Most reputable companies have a responsible disclosure process or bug bounty program. Check their website or contact their security team directly.